HCA Metadata Spreadsheet Guide for Wranglers
NOTE: a user facing version of this doc will eventually reside in the wrangling repo or ingest central as markdown.
This doc also contains wrangler notes and workarounds to help us use the system as it is developed.
Introduction
Spreadsheets (Google Sheets and Excel spreadsheets) are used to gather metadata from data contributors prior to ingest. During ingest the sheets are interpreted and formatted as nested JSON by the ingest importer. JSON can be nested to represent multiple dimensions such as an array of arrays which is often required when multiple biological entities produce multiple entities and some of the fields therein are also arrays.
This document is an in-depth walkthrough for filling out the metadata spreadsheet targeted at HCA wranglers rather than data contributors. It is likely that new datasets won’t perfectly fit into the current schema, and new features or additional fields may be required. Requests for updates to the schema should be recorded as issues in GitHub. Data contributors can also request updates this way or via data-help@thehumancellatlas.org.
What is in this document?
-
Experimental design represented as HCA metadata- How to convert experimental design to a metadata template (currently wrangler led)
-
Making a spreadsheet template- Generating a spreadsheet using the spreadsheet builder (wrangler only) or using the UI interface (After filling out basic project information) (wrangler only) or by tailoring down the hca_full_template.xlsx
-
Filling out the spreadsheet-General layout of spreadsheet tabs how to use it (contributors and wrangler only where highlighted)
-
Using IDs to link entities (wrangler only)
-
What dot notation tells you about a field (wrangler only)
-
Notes on general data types (not all wranglers are specialists in all fields)
-
How to model a sequencing experiment (10X and SmartSeq2)
-
How to model an imaging experiment
-
How to model an experiment that uses cell lines and iPSCs
Who should be reading this document?
-
HCA data wranglers
-
HCA developers who want to understand metadata
-
UX designers who want to understand wrangler operations
What isn’t in this document?
-
A quick digest of this information for data contributors - see the Spreadsheet quick guide for that
-
Details about the entity model we use. This is found here
Experimental design represented as HCA metadata
Prior to metadata entry, a bespoke spreadsheet should be generated that reflects your lab’s experimental requirements. Before generating a spreadsheet to capture the experimental metadata, you need to translate the experimental design into a metadata model with the HCA metadata entities (e.g. biomaterials, files, protocols). You must select types of these entities relevant to your experimental design (e.g. donors, cell suspensions, sequencing files) and understand how they should be linked together.
Wranglers note:
Currently wranglers facilitate this process by directly working with labs or directly studying the publication to understand metadata requirements. Eventually this process will be more user led however, this provides an opportunity to improve our metadata schema.
Project level metadata
Metadata applicable to the whole project is entered in several ‘project level’ tabs and all sheets will contain these tabs. These tabs include: Project, Contacts, Funders, Publications, HCA Bionetworks. These tabs do not need to be part of the entity linking described for biomaterial, file and protocol tabs.
Wranglers note:
- These tabs do not require linking IDs (project does not currently have an ID only a project short name) because they are hard coded to be injected at the project level. This will change when the ticket is addressed in the backlog to avoid this hard coding.
A biomaterial entity overview
Identify the path of biomaterials and files that were created between donors and the raw data files.
Note:
-
Donor is the whole organism (human or mouse).
-
Specimen is often an organ, but the definition is ambiguous by design to allow for tissue samples or liquid tissues like blood.
-
In plate-based sequencing, a cell suspension represents a single cell in a well. In droplet-based sequencing, the cell suspension represents thousands of cells. The cell suspension is prior to the library preparation.
Some example path are:
Donor -> Specimen -> Cell suspension -> Sequence file
Donor -> Specimen -> Imaged specimen -> Imaging file
Donor -> Specimen -> Cell line -> Cell line -> Cell suspension -> Sequence file
Donor -> Specimen -> Cell line -> Organoid -> Cell suspension -> Sequence file
Each biomaterial and file type is a different tab in the spreadsheet. Notice that this allows you to link one entity to many or many entities to one. For example one donor may be the source or many specimens. This would be represented as one row in the donor tab and many rows in the specimen tab. This reduces your effort duplicating the metadata you provide.
Pick a path of biomaterials that are suitable for the dataset.
Adding in protocols
Add in one or more protocols between biomaterial entities:
| Protocol | Sandwich between |
|---|---|
| Collection protocol | Donor & Specimen from organism |
| Aggregate generation protocol | Cell line & Organoid; Specimen from organism & Organoid |
| Differentiation protocol | Cell line & Cell suspension; Cell line & Organoid |
| Dissociation protocol | Specimen from organism & Cell line; Specimen from organism & Cell suspension |
| Enrichment protocol | Specimen from organism & Cell line; Specimen from organism & Cell suspension; Cell line & Cell suspension |
| iPSC induction protocol | Cell line & Cell line; Specimen from organism & Cell line |
| Imaging preparation protocol | Specimen from organism & Imaged specimen |
| Imaging protocol | Imaged specimen & Image file |
| Library preparation protocol | Cell suspension & Sequence file; Cell suspension & Analysis file |
| Sequencing protocol | Cell suspension & Analysis file |
Making a spreadsheet template
As we have seen, the HCA metadata model mirrors experimental design. The entity model described above whereby various biomaterials are connected via protocols and ultimately link to data files can also be thought of as a graph, where entities are the nodes and ‘derived from’ edges link the entities.
Once you understand how to design this metadata graph for your experiment, you can generate a bespoke sheet.
Making the sheet
Wranglers note:
The tool that generates a tailored spreadsheet has been integrated in ingest. You can find it in the Experiment Information tab, Generate a metadata template section of any project in ingest.
The spreadsheet
You should have an empty HCA metadata spreadsheet that resembles your experimental design. This section will describe the layout of this sheet and how to enter your metadata.
Please note:
-
You should not edit the top 5 rows
-
You should fill in metadata starting in row 6
-
You should not change the names of the tabs
Wranglers note:
Actually, only row 4 and the tab name is required by the importer. You can change the other header rows if required for a specific reason. Changing the dot notation in row 4 or the tab name will cause the importer to fail.
Early on a wrangler is likely to have worked through this process to this point before handing a bespoke spreadsheet made with the spreadsheet builder, to the contributors. TICKET
Header rows
Each spreadsheet tab has five header rows that should not be edited. These rows contain:
- Row 1 : the field name
- Row 2 : description
- Row 3 : an example of usage
- Row 4 : the programmatic name - editing this row will cause the ingest importer to fail
- Row 5 : a buffer row separating the header information from where metadata should be entered (row 6 and below).
Wranglers note:
-
The style guide suggests a new metadata term ‘guidelines’. Upon adoption of this the ordering will be slightly altered again. TICKET
-
The spreadsheet builder extracts descriptions, examples, and user-friendly names directly from the metadata schema. If you spot an error in these fields, create a GitHub issue here.
-
While edits to rows 1-3 will not affect how the spreadsheet is imported, edits to programmatic names in row 4 will break the importer. It is advisable to hide row 4 when sharing a spreadsheet with a data contributor to avoid accidental edits to the programmatic names.
Tabs
The following tabs should be in your sheet:
Metadata about the whole project in tabs:
- Project
- Contact
- Funder
- Publications
- HCA Bionetworks
The following tabs may be in your sheet:
Metadata about specific biomaterials:
- Donor organism
- Specimen from organism
- Cell suspension
- Cell line
- Organoid
- Imaged specimen
Metadata about files:
- Sequence file
- Image file
- Analysis file
- Supplementary file
Metadata about protocols:
- Aggregate generation protocol
- Collection protocol
- Differentiation protocol
- Dissociation protocol
- Enrichment protocol
- iPSC protocol
- Imaging preparation protocol
- Imaging protocol
- Imaging target
- Channel
- Library preparation protocol
- Sequencing protocol
Wranglers note:
Contact, Funder, Publications, HCA Bionetworks, Imaging protocol - Probe and Imaging protocol - Channel are sub schema of the Project entity. Currently separation of these fields into separate tabs and subsequent interpretation of these tabs is hard coded. This is a temporary mechanism to allow users to input arrays within schema. TICKET
These types exist in the schema and early iterations of the spreadsheet builder put them into automatically generated sheets but these tabs should not be passed onto user as the metadata is entered by the DCP.
Process - used by ingest
Filling out the spreadsheet
In general
Throughout the sheet, each row corresponds to one entity. The entity type is dictated by the tab the row is in. For example, one row in the donor tab contains the metadata about one donor and each row in the sequencing protocol tab would correspond to a unique sequencing protocol.
Each row contains a user given ID in the first column. This ID can be any string without spaces and should be unique within the spreadsheet.
To indicate that an entity is derived from another entity in the graph you can add the parent entities ID to the ‘source entity ID’ field which is usually in a column close to the child entity ID.
Similarly, you can use the protocol IDs you assign on entities to indicate the protocols you followed to produce that entity. For example, I can add the ID of a library preparation protocol to a sequencing file entity to indicate which protocol I followed during library preparation. You can assign multiple protocols to each entity. For example, you would normally follow a library preparation protocol and a sequencing protocol to generate a sequencing file from a cell suspension.
Some tab specific points
Project
The Project tab is the best place to start when filling out the spreadsheet. It collects summary information about the project. Everything else in the spreadsheet is assumed to belong to the project indicated here. You will typically only enter one row in this tab.
Wranglers note:
Contact, funder, publication information and HCA Bionetwork (HCA Biological Network) is represented by arrays (can have more than one entry for each) and is recorded in separate tabs. Handling of the contact, funder, publications and HCA Bionetwork tabs is currently hard-coded in the importer and not intrinsic to the schema.
Usually most of the information for these tabs, such as author lists and address, is already filled out in ingest and can be edited from the UI.
Contact
The Contact tab contains information about all of the people who contributed to the project. This tab is analogous to an author list for a paper. The metadata entered in this tab will be publicly distributed, so please ensure you have the permission of each contributor to share that information with us.
Ideally we require at least one corresponding contributor. Next to each person indicate if they are a corresponding contributor by entering ‘yes’ or ‘no’.
Wranglers note:
HCA wranglers and external curators may add themselves to each project selecting their appropriate role. Under Project role (project.contributors.project_role), indicate you are a ‘Human Cell Atlas wrangler’.
Linking
Wranglers note:
The HCA metadata spreadsheets are converted to nested JSON documents which can also be visualised as directed acyclic graphs. The links described in this section instruct the importer how to nest the entities in the JSON bundle and become the edges in the graphs. Creating links from the JSON requires the entry of a unique entity ID in the two nodes at either end of an edge.
Each type of shape in the diagram below has multiple types described in the metadata. There are various types of biological entities and file entities (shown below conjointly as ‘Entity’) as well as different protocol types. Each of these is represented as separate tabs in the HCA spreadsheet. You may expect one tab for ‘donor’ one for ‘sequencing files’ etc. Each row within that spreadsheet describes one entity of that particular type. I.e you may have 10 rows in a sequencing tab that describes 10 sequencing files.
This mixed granularity at an entity level allows us to represent metadata at these various levels. However, to interpret this model we must ensure links are created back to derived from entities so the metadata can be retrieved. For example, 10 specimens may be derived from one donor. In this case I would need to create 10 process links from the 10 sample entities back to the donor. By default one process is created between every entity but there are special exceptions detailed below.
Typically HCA metadata contains entities with different ratios. For example, one Specimen may be used to produce several cell suspensions. Spreadsheets are two-dimensional, but we use tabs as a third dimension. However, to build the graph of entities we need to describe the linking between entities to allow us to link the metadata.
All entities should be assigned a unique (within the dataset) ID by the contributor. To create these links you need to enter the ID of the derived from entity into the ‘Source Biomaterial ID’ field.

Biomaterials
Every biomaterial tab has a biomaterial ID field that is the first column. The dot notation for this field is the name of the biomaterial (also the tab) followed by .biomaterial_core.biomaterial_id. Metadata values entered in this column need to be unique within that biomaterial type. All biomaterial IDs should be strings without spaces and are used throughout the spreadsheet to refer to that biomaterial entity.
Every biomaterial tab except the Donor tab has a second biomaterial ID field that is not the first column. This second biomaterial ID field corresponds to the ID of the biomaterial that is the “source” of the biomaterial being recorded in the row. For example, in the Specimen from organism tab, the first biomaterial ID field contains the dot notation specimen_from_organism.biomaterial_core.biomaterial_id to indicate the ID of the specimen being recorded. The second biomaterial ID field contains the dot notation donor_organism.biomaterial_core.biomaterial_id to indicate the ID of Donor from which the indicated Specimen was sourced.
Wrangler note:
More generally, the dot notation of the second biomaterial ID field is the name of another biomaterial followed by .biomaterial_core.biomaterial_id and is used to link the indicated biomaterial to its source biomaterial. Ingest interprets these fields to create a link between the two biomaterial entities. Specifically, ingest is hard-coded to interpret the _first biomaterial ID field_ as the ID for that entity and _all subsequent biomaterial ID fields _ as source IDs for that entity. This hard-coded assumption is not ideal, and will be changed in the future.
In the spreadsheet example below, five tissue specimens were collected from a single donor and the Specimen tab is filled out as:

This will create the following links:

Key points:
-
Always ensure the biomaterial ID for the entity you are describing is in the first column
-
Do not change the tab name
You must create the correct source Biomaterial ID for the tab in question. For example if you wish to represent the following entity path: Donor -> Specimen -> Imaged specimen -> Image file
| Tab | Biomaterial ID | Source Biomaterial ID |
|---|---|---|
| Donor organism | donor_organism.biomaterial_core.biomaterial_id | N/A |
| Specimen from organism | specimen_from_organism.biomaterial_core.biomaterial_id | donor_organism.biomaterial_core.biomaterial_id |
| Imaged specimen | imaged_specimen.biomaterial_core.biomaterial_id | specimen_from_organism.biomaterial_core.biomaterial_id |
| Image file | N/A this is a file entity not a biomaterial entity. | imaged_specimen.biomaterial_core.biomaterial_id |
Note:
- The highest level biological entity (often Donor) is not ‘derived from’ anything. However all other biomaterials in the dataset are derived from another entity, most often this entity will be another biomaterial.
- If a source biomaterial ID field is not shown in the tab, please add the appropriate column to the tab by copying ID column from the source tab and pasting into the target tab.
Processes
One process entity is automatically created between every biomaterial, protocol, and file entity in the graph. A process entity contains metadata about the transition between entities. The process itself contains the who, when, where metadata which is linked to protocol entities with detailed metadata about the methods. One process can link to zero, one, or more protocols.

Protocols
Protocols need to be linked to the processes sandwiched between biomaterial and/or file entities.

To create a link from one collection protocol to 5 processes between ‘donor organism’ and ‘specimen from organism’, we add the collection protocol ID to the specimen tab. We always add protocol IDs to the lower entity in the hierarchy.

Although this sample shows the linking of one protocol, multiple protocols can be added to a process.
Subgraphs
Datasets are not submitted to terra as a whole; instead, datasets are organized into subgraphs. The splitting is roughly technology dependent as files are grouped together based on requirements for each analysis pipeline run. Grouping should be done consistently with other datasets in the HCA. If you are unsure, you should consult with the pipeline developers and other wranglers to define the ideal subgraph.
Ingest creates one subgraph for every process linked to a sequence, analysis or image file. As mentioned above, one process is automatically created between every entity. Therefore, by default each file will be exported in a separate subgraph. Often we do not want this behavior and instead want to group differently.
| Technology | Subgraph content | Files in subgraph |
|---|---|---|
| SmartSeq2, single-end | 1 cell | R1 |
| SmartSeq2, paired-end | 1 cell | R1, R2 |
| 10X, non-multiplexed | R1, R2, I1, I2 | |
| 10X, multiplexed | R1, R2, I1, I2* | |
| Imaging | One FOV per subgraph | TBD |
| MARS seq | One plate | R1, R2 |
| DroNc-Seq | 1 cell | R1, R2 |
| inDrop-Seq | 1 cell | R1, R2 |
*optional
As an example, to create two subgraphs for a SmartSeq2, paired-end dataset consisting of 2 cells, we need to impose two processes each linked to two files.

This would require the following setup in the Sequence file tab:

Analysis files - Subgraphs
Usually, analysis files can also be generated by a single process. For example, the barcodes, feature table and the matrix could be the output of a singular run. We want to capture these in tha same subgraph similarly, so if you have tripplets of analysis files or any other combination that is known to be derived by a single algorithm run, group them together into a subgraph by using a single process to link them to their source entity.
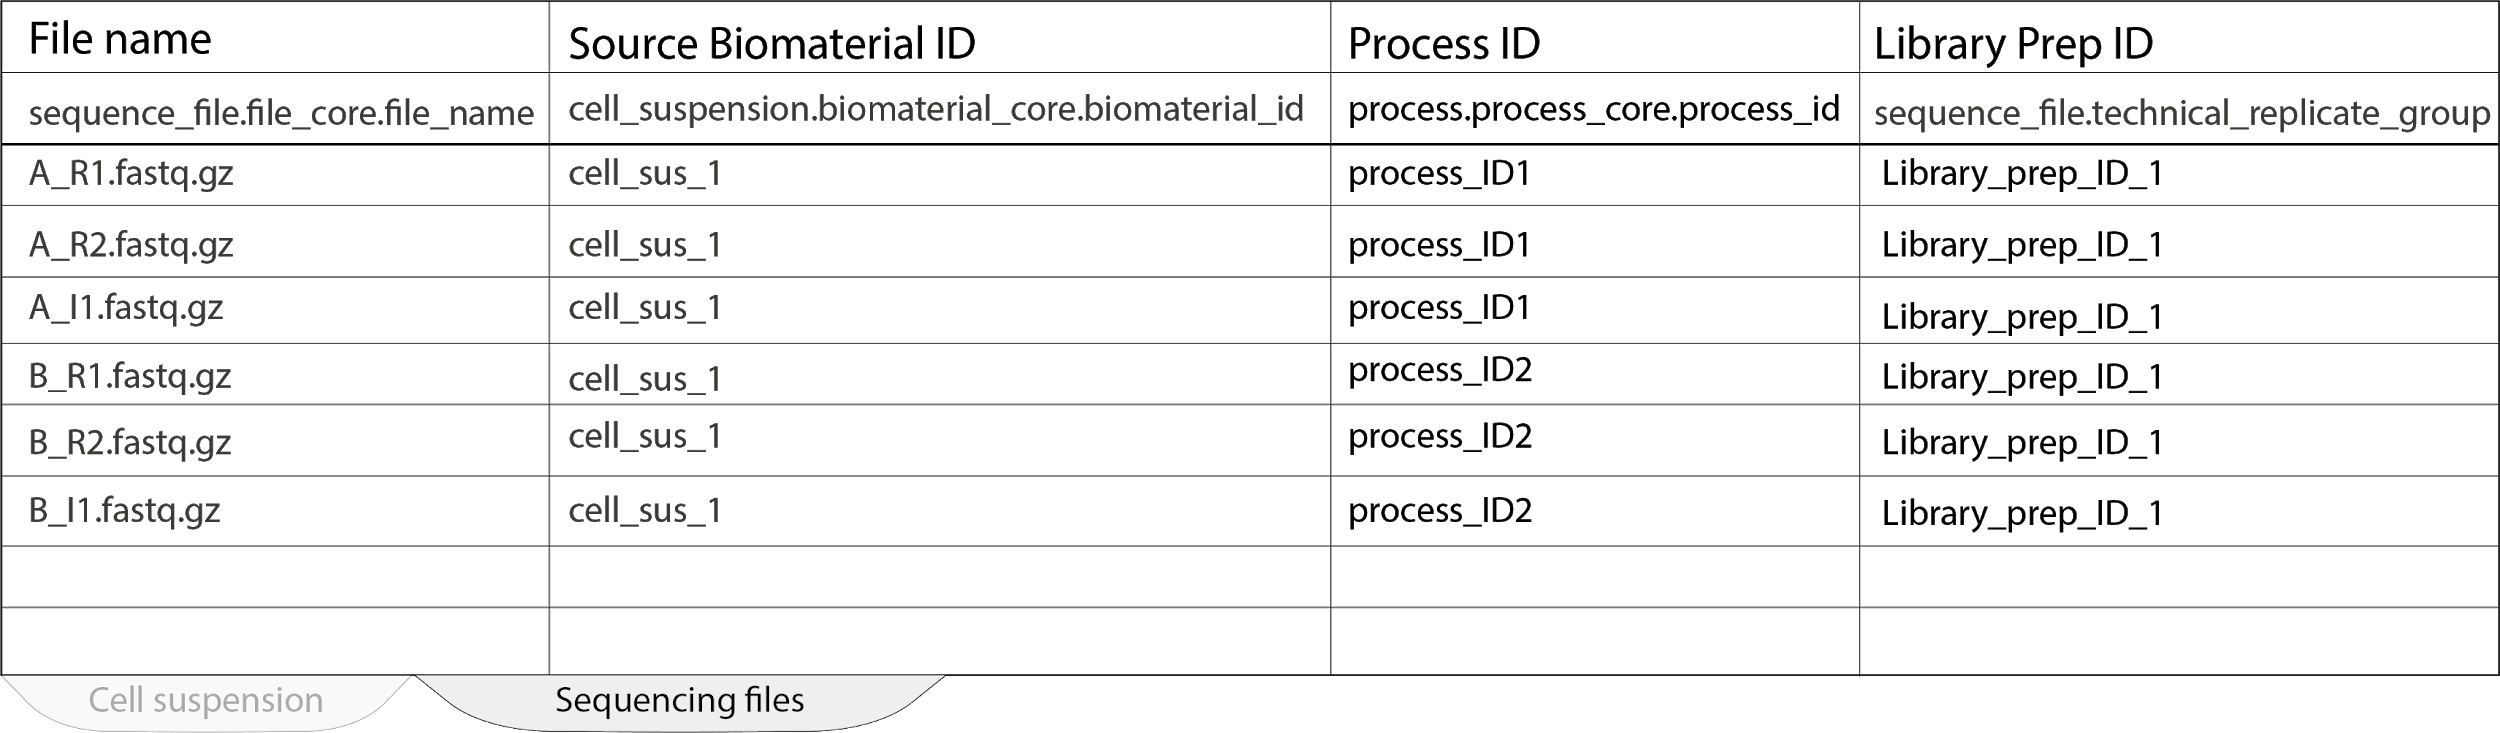
Technical Replicates / Library prep group
Technical replicates are defined as multiple sets of files produced from multiple rounds of sequencing done on the same sequencing library preparation. This definition is generally consistent with how experimentalists think of technical replicate experiments. As we don’t capture sequencing libraries as a separate entity we have to group bundles of sequencing files that were generated from the same libraries.
In this 10X example, one cell suspension has been used to make one library preparation (not represented in the graph) which was then sequenced twice. Here we need to produce two subgraphs by imposing two process IDs from the same cell suspension.

In the Sequence file tab below, notice that although we have linked these two processes (process_ID1 and process_ID2) with the library preparation ID (Library_prep_ID1), the graph is not affected by the library prep ID as links are not created. However, this allows links to be retrospectively added if introspection of technical replicates is required by a data consumer.
Ontology columns
Some fields require identifiers (CURIEs) from the HCA ontology (HCAO) in addition to plain text. Contributors should leave these fields blank if they are unfamiliar with ontologies and request help to fill them out through data-help@thehumancellatlas.org.
Wrangler note:
*Wranglers should familiarise themselves with the HCAO. *
Each ontologized field is represented by an ontology object (module) in the schema. Each ontology object consists of three fields: text, ontology_label, and ontology. The text field contains the string provided by the user. The ontology_label field contains the exact text that corresponds to the ontology field (which contains the ontology CURIE). _CURIES should contain a colon between the ontology and the numeric value, not an underscore.
For example, to represent “heart” in the “organ” field:
organ.text: Heart
organ.ontology_label: heart
organ.ontology: UBERON:0000948
Common Ontology terms
Donor:
Species
- Homo sapiens: NCBITaxon:9606
- Mus musculus: NCBITaxon:10090
Diseases
- normal: PATO:0000461
- type 2 diabetes mellitus: MONDO:0005148
- Hepatic fibrosis: HP:0001395 Human Phenotype (HP) has some overlap with MONDO, but it’s a phenotype ontology rather than a disease ontology, so whenever the same term is available in MONDO we should use the latter.
Development stage
- adult: HsapDv:0000087
- newborn: HsapDv:0000082
Wrangler note 1: For humans, use only development stages from the Human Developmental Stages ontology. For mouse, use appropriate stages from EFO’s developmental stage hierarchy (EFO:0000399). Never use Uberon developmental stages!
Wrangler note 2: Be careful to differentiate between disease at the level of the organism and disease at the level of the specimen! Diseases captured at the organism level should include any conditions that the donor was diagnosed with, irrespective of whether they are likely going to affect the specimen. Diseases captures at the specimen level should include any conditions that affect the specimen only, without there necessarily being a diagnosis available for the donor. Examples include tissue cirrhosis or necrosis, or neoplasms without system-wide symptoms. The disease field can also accept terms from the phenotype ontology HP.
Specimen:
Diseases
- normal: PATO:0000461
- cirrhosis of liver: MONDO:0005155
Organ
- organ: UBERON:0000062
- immune system: UBERON:0002405
- embryo: UBERON:0000068
Cell line:
Cell type
- blastocyst: UBERON:0000358
- embryonic stem cell: CL:0002322
- inhibitory interneurons: CL:0000498
- peripheral blood mononuclear cell: CL:2000001
Collection:
- blood draw: EFO:0009121
- leukapheresis: EFO:0009126
Dissociation:
- enzymatic dissociation: EFO:0009128
- Ficoll-Hypaque method: EFO:0009110
- FACS: EFO:0009108
Library preparation, sequencing:
- polyA RNA: OBI:0000869
- Smart-seq2: EFO:0008931
- RNA-seq: EFO:0008896
- full length single cell RNA sequencing: EFO:0008441
- PCR: OBI:0000415
- Illumina NextSeq 500: EFO:0009173
- Illumina HiSeq 2500: EFO:0008565
FAQ
What should I do if metadata is missing?
If metadata is missing for an optional field (column), leave the field blank. If metadata is missing for a required field, fill in the field with one of the standard missing phrases depending on the situation. See GitHub issue #315 for values we plan to implement.
Wranglers FAQ
Wrangler tools are documented in wrangler docs.
What does the programmatic dot notation name tell me?
e.g. process.process_core.process_id
The ultimate term in the string is called the unqualified field name and is always the term after the last full stop***. In the example above, the “process_id” term is the unqualified field name. The unqualified name never appears in the spreadsheet in isolation. The user-friendly version of the unqualified name appears as the column header for that field.
The full string is called the qualified field name and is always the full path through the schema hierarchy. In the example above, the “process.process_core.process_id” term is the qualified field name. The qualified name appears in the spreadsheet in row 4 and is used by the importer to convert the spreadsheet to JSON documents and guide linking between entities.
Exception for ontologized fields**. For fields that are governed by an ontology, the unqualified field name is the penultimate term. The unqualified field name is then followed by either “text”, “ontology”, or “ontology label” as the ultimate term. In the example below, **selected_cell_type** is the unqualified field name, and can be followed by .**text**, .**ontology**, or .**ontology_label
e.g.
cell_suspension.selected_cell_type.text
cell_suspension.selected_cell_type.ontology
cell_suspension.selected_cell_type.ontology_label